Saturday, June 27, 2015

Chicken Treats, An Ongoing Mission

Bridgette, inspecting the goods.
Things continue to be busy here at the city pre-farm.  We are getting oh so close to listing.  Today was 'help a friend move' day, so we are all pretty bushed, but even tonight we are working away.  Hubby laid the sub-floor for the basement bathroom, which is the last big project left. Yesterday, I installed a door stop, put in a threshold, put some trim up, and finished crack filling the bathroom.  Other small things also continue to get crossed off the list each day.

Amidst all the construction, we still have The Girls, as well as the other pets, to think of.  I like to keep things interesting out in our all-girl sorority coop, so I'm always looking for an interesting idea.  A few days ago, I picked up a wild bird seed bell.  It has domestically grown seeds, so I figured although it isn't organic, even we splurge and have take out once in awhile, so the girls got some 'junk food' too. They Loved It!  They had it finished in less that a day.  It was kind of like chicken tether ball as it swung around and they took turns having a peck.

Today, I was on the hunt for a new treat.  I had seen an idea a few months ago about stringing vegetables and fruit to make a treat garland, so I thought I would give it a try.  I bought some brussel sprouts and radishes, hubby helped by drilling holes through them first, and then I strung them together using a darning needle.

The girls were curious, yet cautious, at first.  Bridgette is always the first to get involved in anything you are doing, and this was no exception.  Once she inspects, the others are never long joining in.

She's such a funny chicken.  She just loves people.  She follows us around like a dog, and loves getting right into the middle of any work you are doing... especially if it involves digging... she loves worm hunting!    Try out this easy chicken treat and let me know how your chickens like it!
Official treat inspector, Bridgette, while  Smokey (behind, left) lends a curious eye and Hawk-Eye (hind, right) poses for the camera.


Tuesday, June 23, 2015

Rhubarb Blueberry Crumble- Yes, Please!

Gather around, everyone, it's recipe time!  

In my corner of the world we are in the middle of rhubarb season, and let me tell you, I love me some rhubarb.  Its tart, its tangy, it can be sweet and it has so many uses.  It can also be FREE, if you know where to find it.  Otherwise, they are selling it for $2.99 per pound at my local grocer *snort!*.  

**please pardon the following rant, or join me for the actual recipe below**


I'm sorry if you have to buy your rhubarb at a grocer that charges that price for rhubarb.  To me, its robbery.  This is the same place that was selling bunches of dandelion greens for $4.99.  HA!  Seriously?  I have a wonderful crop of my own very, un-sprayed, dandelion greens in my backyard.  I'll keep my $4.99 for dandelions, my $2.99 per pound for rhubarb and up you some blackberries that I'll likely save $5 on later in the season by picking myself.  I guess what I'm saying here is that you need to go spend some time in the wilderness, at different times of the year, and learn where things grow.  Not only are you saving yourself lots of money, they are likely better for you than the same items you may pay for in the store (hello, farmed fiddle heads..really?!?).

...and back to our regularly scheduled recipe post.

There are so many uses for rhubarb and I'm going to do my best to show you some while free-rhubarb season is here.  Today, after washing, cutting and freezing some, I made a delightful crumble.  Here's how:

3 cups rhubarb- washed, and cut into 3/4-1" pieces.
2 cups blueberries- frozen work nicely, but you can use fresh if you have them 
3 tablespoons of cornstarch-  You can substitute this for about 6 tbsp of white flour, if you don't have the starch on hand.  
1 cup sugar- today I used regular white granulated, but if you are opting for a less refined version, you can use one cup palm sugar, which lends a delightful undertone to the dish.
1 tbsp lemon juice
4 tbsp fruit juice- you could use apple (unsweetened) or orange.. today I used a dash of pure cranberry I had left over from making kombucha ( I'll be posting about that soon).
1 tbsp butter

For the crumble you'll need

3/4 cup flour
3/4 cup brown sugar
6 tbsp butter
1 tbsp cinnamon ( or to taste)
pinch of salt

So here's what you do:

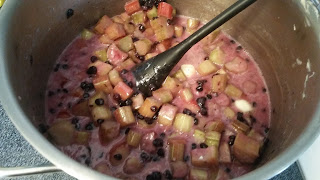
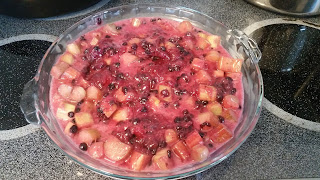
Add the sugar, butter and starch/ flour in a pot, then toss in your rhubarb and blueberries and stir to coat.  Turn on the heat and let it cook for a few minutes until the sugars are melty, the juices are flowing and the butter has done its buttery thing.  You don't want to cook the rhubarb through.  Add the lemon juice, the fruit juice, and give it a good stir. All this goes into a deep dish pie plate or similar sized dish.  I like glass, you can use whatever you like.

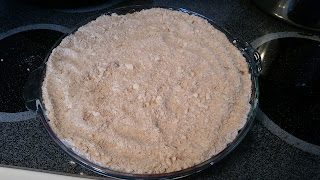
On top of this you want to add your crumble, which you made by adding all the crumble ingredients together and chopping it, until the butter resembles tiny little pebbles... and it resembles a crumble.

Put it in a 350 degree oven and bake about 30 minutes.  You'll know its done when the smell starts wafting through your home and everyone is following their noses to the kitchen.  Careful though, its super hot and you should wait before eating it.  You know what else is good? Eating it with vanilla ice cream.  Yummmmm bo.

Enjoy!

What are your favourite rhubarb recipes?

Thursday, June 18, 2015

End of the School Year Teacher Gifts


7
Tomorrow is the last day of school here, and although making end of the year teacher gifts may not be completely related to our journey of city living to country living, I think it`s something that almost all of us encounter at some point in our lives, or we know someone who does!

Holy run on sentence, Batman!

In our home, we have two teachers, and three teachers` assistants to buy for, so spending even $20 per person can get pretty expensive.  With all of the renovations and house prepping going on around here, the last thing we need is expensive.  In order to accomplish this I needed to be resourceful!

First, I went to the dollar store and bought some terra cotta pots.  2 for $1.25, can't beat that!  I also grabbed some of the saucers for underneath at 2 for $1.

My second step was to spray paint them with chalkboard paint.  I already had this on hand from a previous project, so I didn't have to buy it.  If you needed to get some, you could probably buy it at your local hardware store for $4-$7.

When doing this step you need to make sure you are either outside or in a very well ventilated area- this stuff is very strong!  If you are outside you need to pay very close attention to the direction of the wind, because tiny particles can drift quite a distance and lovingly attach themselves to nearby objects.. like your car.  I might have learned this lesson in the past.  Just take my word for it ;)  I did two coats on mine.


Once dried, its time for designing.  I liked this one and thought it was appropriate for teachers. They say `Thank You For Helping Me Grow`.  Have fun with yours!  There's so much room for creativity here!  I used acrylic paints from the dollar store (which I already had, at $1 each).

For the flowers I visited my local garden centre.  I went there looking for a 6 cell package of flowers, so I could plant one in each pot, which would have cost me $2.99... making this project a total cost of about $7.  Unfortunately, they didn`t have any flowers with actual blooming flowers in 6 cell packages, so I ended up spending $19.76 on 5 six inch pots. I`m still happy with the low cost of this project.  If you had to buy the chalk paint, 2 acrylic paints, 2 pots, 2 saucers and a 6 cell of flowers, you could make this gift for two teachers for about $15 including tax.  That's pretty good, considering once the paint is purchased the price for subsequent pots goes down significantly.

Here`s to the end of another school year and the beginning of summer vacation.  I have a feeling (and a hope) that this summer is going to be busy, fun, and full of changes.  I can`t wait!

Tuesday, June 16, 2015

A Recent Goaty Adventure

I am known for my random adventures.  When I wake up in the morning I know one thing is for sure:  There's a darn tootin' good chance that the day is NOT going to go as I have planned.  Usually this is a good thing and its a positive outcome.  Today was one of those days.  I planned on working around the house, and instead I ended up foraging in the hills for wild rhubarb and getting free lilac seedlings for the future property with my friend Anne, having lunch with my friend Jenn W and then helping my sister with a case of keys-locked-in-the-car.  I didn't come on to tell you about today though.  I wanted to talk to you about two Tuesdays ago and my adventure with Jenn B.

Side note: I have to distinguish between Jenns because there are a few of them. :)

Miss Dot.  Such a lady.
Two Tuesdays ago, I got a call from Jenn B.  She asked me if I was interested in going on a morning adventure with her and of course my answer was yes.  I'm always up for adventures, the crazier the better!  

Todays' adventure: visiting a small goat farm.  I'm actually not sure if you would actually consider it an actual 'goat farm' per se or a goat homestead, but its is the cutest hill side farmstead, run by two of the nicest women you'll ever meet.  They have 14 goats, chickens and on this particular day a beautiful horse arrived to pasture on their hilly fields for the summer.  I'm not going to name names or actual locations because I haven't asked if I can go into such details, but it suffices to say that when you pull into their yard it reminds you of a quaint hillside in Italy or Tuscany, except when you turn around you are looking at one of the most amazing views of water, hills and valleys.  To wake up there every morning. Seriously...

These ladies are locally known as the goat ladies. At one time they actually made and sold various goat milk products, such as soaps and deodorants and let me tell you, they have the sweetest little herd of goats, all with the cutest personalities and who all love their mommas very very much. If there is an injured goat that is down on its luck in the area, you can be sure they have probably been contacted for their expertise or have it there with them for rehabilitation.  

They actually don't have their property fenced in like most goat related articles you read say is absolutely imperative for owning goats.  Their trip is actually very content staying right there.  How heart warming is that.. seriously?!  

Neat and educational fact:  A group of goats is called a herd or a trip!

On this day it was raining, so they were all hunkered down in their goat sheds keeping dry and warm, but I had the wonderful privilege of meeting them all.  

They also have the sweetest little flock of banties with a few banty frizzles thrown in.  I love their feathered feet, which gives them a hip bell bottom look.  So fashionable, those chickens!

The hip chickens.

I'm excited to be going back to visit them again soon, on a sunny day.  More pictures to come and hopefully I'll be able to introduce you to the wonderful ladies who love these sweet little goats so much.  Let's just say this friendly little tribe of happy little goats solidified my decision to have some on our farm.  

Oh, who am I kidding (haha...punny), I was going to have them anyway... :D


Sunday, June 14, 2015

Chair Planter Project

Renovations have been in full swing here at the pre-farm.  I've been taking pictures as I go along, so I can show you some updates.  Sometimes I remember to take 'before' pictures, other times I get half way through it and then remember.  That's sort of what happened with the chair planter project.  This chair has been sitting in my garage for about two years, probably longer, waiting for a project.  I'm great for snagging awesome pieces of furniture for a future project.  I'm also great at not exactly getting them done.  I can't help it, I LOVE a great piece of old furniture.  They just scream POTENTIAL!  I actually recently sold a lot of pieces, so I could de-clutter the garage.  I'm sure when we getting settled I'll build up my inventory again in no time. I think I can hear hubby groaning from here....

So, the chair planter.

I wanted it to POP, so I picked out a fun, cheery colour for the project.  I have a small side table in a similar colour in the house and I often get complimented on its out-of-place quaintness and how it is just... happy.  The exact colour I chose for this chair planter is Thai Teal by CIL.

This is where I  REALLY wish I had a before picture. It was a dark stained wood, with caning in the seat, that was in need of repair.  The first step was to get rid of the caning, which my son B did for me.. and he did a great job :)  Secondly, it needed to be sanded to rough up the wood, so the paint would hold on better.  This was a messy job, let me tell you!

After the sanding, came a wipe down and then it was on to my favourite part- the painting!  This chair had a lot of small detail, so it look a lot of dabbing to get in all the little creases.  I also had a visit from a honey bee... which was great!  Luckily, he didn't land on the wet paint.  He just hung out for awhile and then continued on his journey.  I sure hope to have some bees when we get settled!  More on that later... I could take up an entire post with my bee thoughts. Buzz Buzz!

I ended up doing three coats on the chair, to get it completely covered.  I was so happy with the outcome!

 Now, a chair planter isnt a chair planter without some plants, so off to the local garden centre I went!  I`m a regular there, so when I wandered the isles for about half an hour they didn`t call the police- BONUS! :)  I ended up bring home some Sweet potato vine and a Vinca varigated vine for cascading over the front, some Euphorbia Glitz, some petunia, a Black Eyed Susan Vine for crawling over the back of the chair and Angelonia because its taller and will stand up behind the others.  The pot is simply one I had in the shed from a past year, which just happened to be the perfect size for sitting in the hole (where the caning had once been).  If you are doing a project like this, make sure to pick a pot with a small lip that is just bigger than the hole, so it sits down in the hole, but holds itself up.

Even though this wasn`t on my list of required projects to finish before listing the house, I still thought it was important.  As I said to B when he asked why I was buying MORE flowers instead of working on the house: you want to create a welcoming, happy feeling when you are selling.  Not only can I take this chair with me to our new house, but its going to make people feel happy when the walk into this one!

Monday, June 08, 2015

Potato Tower Project!

The past couple weeks have been busy.  Last week I finished up at my 'day' job for the summer, so preparing the house for sale has ramped up into full gear.  Today was day eight of painting.  Eight. Days.  I love painting, but I have to admit that I'll be happy to see the end of painting, at least at this house and for a little while.  I'm sure when we get moved to our country farm home I'll start again, making it our own.  I'm hoping to have a sign on the front lawn within two weeks. Yippee!

Aside from painting, I've also been working on getting the outside ready.  I figure if the outside got planted, then it would have time to grow and fill out some while I'm working inside.  Luckily, (or not so luckily?) the weather here has been less than summery, so I don't feel like I've missed out being inside so much.

As part of my outside work, I decided I would try my hand at a project I've seen here and there on social media these past couple of years- a potato tower.  With downsizing our raised bed garden to appeal to potential new owners, there wasn't a lot of room left for planting potatoes.  Those buggers take up a lot of room!

This, right here, is Exhibit A.
>>Insert perfect opportunity to try potato tower here<<

Now, I didn't want it to cost of a lot, because I've been spending a lot on paint and things to get the house ready, so I decided to use materials we already had on hand, and see how it goes.  We had a few pallets I had salvaged a few years ago behind the shed, so they were perfect candidates for the main frame.  Woohoo!  FREE!   I also wanted something that I could 'hopefully' bring with us, so using four full pallets was out of the question, because that would be one HUGE potato tower.  Yay for potatoes, not yay for the poor people who have to at least TRY to move it when the time comes.  Solution?  Cut those suckers in half!

Once cut right down the middle, we just screwed them together, to make a box.  See exhibit A.  Now, we couldn't leave the bottom open, because moving it would mean losing all the potatoes out the bottom, so we screwed a piece of wood that we had lying around to the bottom.  Viola!

For filler I was torn between a lot of dirt, a combination of dirt lined with straw or straw lined with dirt.  Since I had more straw than dirt, I opted from option 3.  I basically just layered it:  Base of straw, covered with dirt and compost, distributed seed potatoes, and added more straw. Repeat.  The only additional thing that I did was to add a random piece of hosing down the middle.  I figured this would help get water down to those bottom layers, to keep everything well-watered.  Do you remember my sweet potato slip post from a couple of months ago?  Those pretty little ladies were also included in the potato tower, even though they aren't even technically related to the Russets and Yukons that I planted in there as well.

WHAT is this, you say?  Not related?  That's right!  Not even cousins.  Sweet potatoes are related to morning glories, in the Ipomoea genus (say whaaaat?!?!) and potatoes belong to the nightshade family.  Mind blown.  You're welcome, and that concludes today's biology lesson.

You should most definitely try your hand at a potato tower.  I mean, why not?  I'll periodically update you on how mine is coming along and I'd love to hear your updates as well.  Let me know what works for you.